PPTP network protocol (Point to Point Tunneling Protocol) will allow you to create a virtual private network (VPN for Virtual Private Network) between a remote client (you) and a private server. We will see together how to add and configure a connection of this type on Microsoft Windows 10.
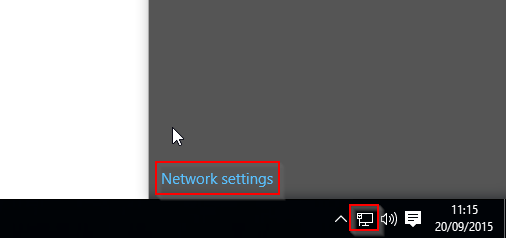
To start, click left on the network icon of your taskbar and then on “Network settings“.
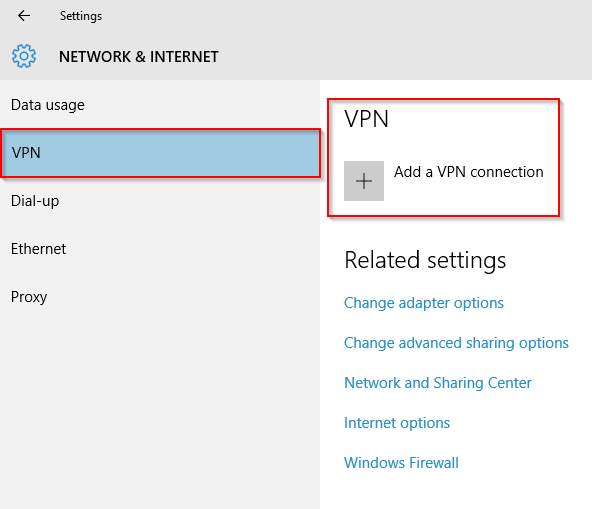
Click the “VPN” tab and click “Add a VPN connection” to add your new VPN connection.
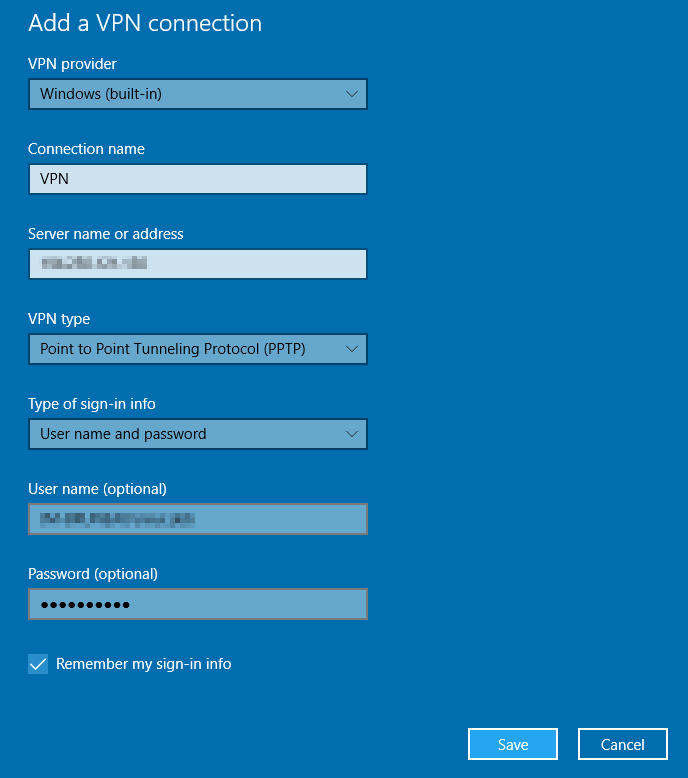
- VPN provider : Select “Windows (built-in) “
- Connection name : Enter the name that will be the VPN connection.
- Server name or address : Enter the IP address or the name of the domain associated with this IP.
- VPN Type : Select “Point to Point Tunneling Protocol (PPTP)“
- Type of sign-in info : Select “User name and password”, it’s your login/password (may differ depending on the configuration of the PPTP server)
- User name (optional) : in our case, enter your login.
- Password (optional) : in our case, enter your password.
- Check or no “Remember my sign-in info” depending on if you want to keep in memory the credentials.
Finally click “Save” to save the connection.
To connect, you just have to select your new VPN connection, and then click on “Connect“.
If the settings you entered are correct then you should see “Connected“.
You can also check the IP address assigned to your connection by typing “ipconfig” via a Windows prompt.





![[TUTO] – Windows 10 : Disable Windows Defender on Windows 10 windows10_logo](https://sys-advisor.com/wp-content/uploads/2015/07/windows-10-logo.jpg)
![[TEST]-Xiaomi: Getting Started with the Xiaomi Roborock S50](https://sys-advisor.com/wp-content/uploads/2019/02/splash_xiaomi_roborock-100x70.jpg)
![[TUTO] – Recalbox : How to add new ROMS to your Recalbox](https://sys-advisor.com/wp-content/uploads/2017/12/splash_recalbox-100x70.png)
![[TUTO]-Skype Enterprise: How to connect to Skype online in Powershell](https://sys-advisor.com/wp-content/uploads/2017/12/smash_skype_enterprise-1-100x70.jpg)

